By connecting to the VPN service when you are off campus, you assure that the data you transmit will be secure between your host and the UCSB core network. Once it arrives on campus, it is decrypted and sent in the clear. Furthermore, it allows you to gain access to resources that are restricted based on source address. While you are connected to the VPN server, you appear to other hosts at UCSB as if you were on the UCSB network. This also allows you to gain access to external resources from off campus (such as library resources) that are based on UCSB source addresses.
The UCSB VPN service uses AES (Advanced Encryption Standard) with a key length of 256 bits. The National Institute of Standards and Technology (NIST) has created AES, which is a new Federal Information Processing Standard (FIPS) publication that describes an encryption method. AES is a privacy transform for IPSec and Internet Key Exchange (IKE) and has been developed to replace the Data Encryption Standard (DES). AES is designed to be more secure than DES: AES offers a larger key size while ensuring that the only known approach to decrypt a message is for an intruder to try every possible key. It also uses a technique called Cypher Block Chaining (CBC) in which each plaintext block is XORed with the previous cypher text block before encryption. This makes dictionary-style attacks very difficult and increases the overall effectiveness of encryption.
Generally yes. HTTPS and SSH provides end-to-end encryption whereas the VPN server only provides encryption from your client up to the server hardware itself, which is located on the UCSB core network. Once the traffic is on the UCSB core network, it is decrypted and sent to the UCSB host in the clear.
The following limits exist on VPN sessions:
Idle Timeout: 60 min.
Max Session: 720 min. (12 hours)
When five minutes remain on your VPN session, you will be prompted if you would like to extend your session. If you click "Yes," your connection will stay intact and your session timer will be restarted.
Each user may have up to three concurrent VPN sessions active from various devices.
The UCSB VPN Service assigns addresses from the following subnets:
Visit our IP Address Check
This is an indication that your VPN client is not installed correctly, or you do not have an active connection to the VPN server. Try re-installing the client, or re-initiating your connection from the VPN client. A last option is to reboot your computer and try re-initiating the connection from your VPN client.
As of mid-2017, our VPN customers have had positive experiences connecting to the campus VPN from networks in China, behind the Chinese government's firewall technologies. Ivanti Secure Access uses ESP over port 4500/UDP for VPN transport and will fall-back to SSL over 443/TCP if ESP can not be negotiated (for instance if the ISP is blocking or throttling it.) This provides flexibility for connectivity from remote networks.
Depending on future technical methods deployed by China's government firewalls, it may not be possible to connect to the Ivanti Secure Access VPN. We will update this FAQ as new information is discovered.
You may receive this message after successful authentication to the Campus VPN Service if you do not have a valid affiliation in the UCSB Campus Directory. Valid affiliations for connection to the Campus VPN service are:
- contractor
- employee
- extension
- pre-hire
- student
- academic-affiliate
For more information about guest affiliations, see Identity Services pages
If you are receiving this message and have a valid affiliation and valid UCSBNetID and password, your access to the VPN and Wireless may have been blocked administratively by the NOC/SOC due to a network security issue. Please check your email for a message related to the issue.
Each UCSBnetID account may have one or more "affiliations," which indicate the relationship between the account holder and UCSB. For example, a current student would have a "student" affiliation. The affiliation information is automatically updated as people join and leave the campus.
Affiliations eligible for VPN service include:
- Academic Affiliate
- Contractor
- Employee
- Extension
- Pre-hire
- Student
You can verify your UCSBnetID password and check your current affiliation information on the UCSBnetID Diagnostics page.
As of August 2, 2021, Duo multi-factor authentication is required to sign in to the campus VPN (Ivanti Secure Access). Once you have signed in with your UCSB NetID credentials and they have successfully authenticated, you will be prompted to enter which device you want to use for MFA for this connection. You have a few options:
- Type 'push' in the designated field to get a push notification via the Duo mobile application on your smartphone. Approve the Duo request on your smartphone and your VPN session will begin.
- Type 'sms' to receive a new set codes via an SMS message on your phone. At this point, the login will fail. You will need to re-enter your credentials and input the fresh SMS passcode in the designated field (see below). SMS passcodes are good for one hour from the time you receive them.
- Enter the passcode from your Duo mobile app, SMS passcode, or hard token.
For more information about Duo usage with Ivanti Secure Access VPN, see: https://guide.duo.com/pulse
For help enrolling your device with UCSB Duo, see: https://www.it.ucsb.edu/mfa
You can find more about the distinctions in Duo device setups here: https://www.it.ucsb.edu/getting-started-mfa-duo/which-devices-should-i-enroll-mfa-duo.
You have a short period of time after entering this information to approve the Duo push notification or enter your code. After you approve the Duo push or enter your code, it should take less than ten seconds for your VPN connection to complete.
Your system is missing the Root or intermediate CAs.
Windows:
Internet Explorer can install these automatically to the Windows Certificate Store if you browse to https://ps.vpn.ucsb.edu/install) If you don't wish to use Internet Explorer, you can complete this task manually.
Download the root CA and intermediates from the bottom of this page:
After they are downloaded, double-click on each certificate to install them - this will open the Windows Certificate Wizard.
Mac OS:
Download the root CA and intermediates from the bottom of this page:
After they are downloaded, double-click on each certificate to install them into your system Keychain.
Error 2738 may be due to an earlier install of McAfee, Kaspersky or AVG AV software. This is a known issue and can usually be remedied by temporarily disabling the AV software while you install Ivanti Secure Access. If this does not resolve the problem, (or none of the AV software mentioned is currently installed) it is recommended to run the McAfee removal tool (or the AVG/Kaspersky removal tool), reboot your computer and then try the Ivanti Secure Access install again. You can re-enable the AV software once you have successfully installed the VPN client software.
The McAfee removal tool can be found here: http://download.mcafee.com/products/licensed/cust_support_patches/MCPR.exe
The AVG removal tool can be found here: http://www.avg.com/us-en/utilities - download the 32bit or 64bit version depending on your OS type.
The Kaspersky removal tool can be found here: http://support.kaspersky.com/common/service.aspx?el=1464#block1
Yes, it is safe to follow the prompts in this message. The VPN server can provide users an up-to-date client to Mac and Windows users automatically. Click "Upgrade" to follow the prompts to upgrade your installed Ivanti Secure Access VPN client (an Administrator username/password are required to complete the upgrade on Mac systems). Any customized connection profiles you created in the Ivanti Secure Access VPN client will be saved after the upgrade.
-
Click the Apple menu at the top left of your desktop.
-
Click System Preferences.
-
Click Security & Privacy.
-
Click the lock to the unlocked position to make changes.
-
Click the General tab.
-
Under Allow apps downloaded from, select App Store and identified developers
-
Look for the following message: System software from developer "Pulse Secure LLC" was blocked from loading.
-
Next to the message click Allow to enable the extension.
-
Click the lock icon to the locked position to save changes.
-
Close the Security & Privacy window.
-
The kernel extension has been authorized and full functionality of the Ivanti Secure Access Desktop client should be available.
-
Restart your computer (important!)
-
Open the Ivanti Secure Access client and try connecting to the VPN
Apps that are from the Apple Store are subject to review and scanned for malicious content. Apps from outside the Mac App store have not been scanned so when you install them, macOS runs a scan on it. Our installer package has been signed by a valid Developer ID. It should install properly after you follow the instructions on this page to resolve the issue:
When transitioning to the newer InCommon (Sectigo) CA hierarchy, older versions of macOS (such as Catalina, Mojave, or Big Sur) frequently throw certificate validation errors in the Ivanti Secure Access Client.
This happens because the Ivanti client on older macOS versions relies heavily on the System and System Roots keychains to build its trust path, and older OS releases do not have the modern Sectigo/InCommon root and intermediate certificates pre-installed or correctly evaluated.
To resolve this issue, you must manually import the certificates into the correct keychain and adjust the trust evaluation settings.
Step 1: Download the Correct CA Chain
Here are the correct Root and Intermediate certificates used by Sectigo/InCommon:
- The Root CA: Sectigo Public Server Authentication Root R46 - exp Jan 18, 2038
- The Intermediate CA: InCommon RSA OV SSL CA 3 - exp Nov 5, 2035
- (Cross-signed Root CA): USERTrust RSA Certification Authority - exp Jan 18, 2038
Here is a link to the bundled certificate file to install.
Before proceeding, please make sure you have completely exited out of/quit the Ivanti Secure Access VPN client.
Step 2: Import into the "System" Keychain (Not "login")
By default, double-clicking a certificate installs it into your personal login keychain. However, system-level daemons like Ivanti require them to be in the machine-wide System keychain.
- Open Keychain Access (Navigate to Applications > Utilities > Keychain Access).
- In the top-left sidebar, under Default Keychains, select System.⚠️ Note: Do not modify "System Roots", as macOS protects this space. Use System.
- Click File > Import Items... from the top menu bar.
- Select the downloaded InCommon Intermediate and Sectigo Root certificate files and click Open.
- You will be prompted to enter your Mac's administrator password to authorize changes to the System keychain.
Step 3: Explicitly Configure "Always Trust"
On older Mac operating systems, the network stack may still fail to link the chain automatically. You must manually force macOS to trust the root anchor.
- While still in the System keychain, locate the newly imported Sectigo Root CA certificate.
- You can find the System option in the lower left. The certificate will be named something like "InCommon RSA OV SSL CA 3".
- Double-click the certificate to open its properties window.
- Click the disclosure triangle next to Trust to expand the configuration options.
- Change the dropdown menu for When using this certificate: from "Use System Defaults" to Always Trust.
- Close the window. You will be prompted to enter your admin password again to save the change.
- (Optional) If the intermediate InCommon certificate still shows an untrusted red "X", repeat this process for the InCommon Intermediate CA as well.
Step 4: Purge Ivanti Secure Access Client Cache and Restart
The Ivanti client aggressively caches certificate failure states. Even after updating the Keychain, it may continue throwing the error until its service is restarted.
- Disconnect the VPN and completely Quit the Ivanti Secure Access Client from the macOS menu bar icon.
- Open Terminal (Applications > Utilities > Terminal) and restart the underlying Ivanti network daemon by running the following commands:
sudo launchctl unload /Library/LaunchDaemons/net.pulsesecure.AccessService.plist
sudo launchctl load /Library/LaunchDaemons/net.pulsesecure.AccessService.plist
- Re-open the Ivanti Secure Access app and attempt your connection.
Users are permitted three (3) concurrent sessions on the Ivanti Secure Access VPN server. When all three of those sessions are allocated, this error will occur and the user can not sign in. To address this error, we recommend the user sign out of all known VPN connections and then attempt to sign in through the Ivanti Secure Access client again. If there are no known logged-in sessions, please open a ServiceNow ticket at ithelp.ucsb.edu and we will clear your sessions.
Yes, it is safe to click "Allow" in this message. The VPN client from Ivanti Secure Access requires kernel-level access on a Mac OS system in order to take full control of your system's network connection. Click "Allow" to permit use of Ivanti Secure Access VPN client on your system.
Sometimes the geolocation for an IP or set of IPs can get confused, resulting in Google categorizing the IP as being in Hong Kong. To resolve this issue, first try going to Google's "no country redirect" URL at google.com/ncr. That will reset cookies and should reorient you to the proper geolocation (such as USA). You can also try using Google’s IP problem form to report the issue (though resolution can take weeks).
The first thing to try when you are having network issues is to restart your computer. The vast majority of issues resulting from error 1133 are resolved via a reboot.
You could also try disabling IPv6 in your network settings. On a Mac, open System Preferences > Network, select the active network adapter, click on the Advanced button from the right panel, click on the TCP/IP tab, select the Configure IPv6 drop-down menu, and set it the to Off. Click OK and restart your Mac.
To manually configure your UCSB connection profile in the Ivanti Pulse Secure client, add a new connection profile and enter the following key components:
Connection Name: UCSB Remote Access Trusted
URL: https://ps.vpn.ucsb.edu/ra
Ensure that you have typed the URL exactly as listed above - http: will not work - it must be https:
The connection name and URL are the only adjustments required. Everything else can stay as default. Once you've entered the information, choose "Add". You should now be able to connect with your newly created profile.
Our campus VPN vendor, Pulse Secure, was purchased by a software company called Ivanti in December of 2020. The transition has been largely transparent thus far. However, after July 22, 2022, some users may notice that their clients have updated and changed version number, icon, and name. Previously, the Pulse Secure mobile app appeared as a dark icon with a green stylized S. The new Ivanti Secure Access Client app appears as a red/orange icon with a key.
For all other intents and purposes, nothing else about the Campus VPN service has changed. You can still expect the same functionality from the new Ivanti Secure Access client - the change in name and look is purely cosmetic, as Ivanti has been running Pulse Secure for nearly two years as of the client update.
You can read the Ivanti knowledge base article about the changeover here: https://kb.pulsesecure.net/articles/Pulse_Secure_Article/KB45301
If you are having trouble with your client after upgrading from an old Pulse Secure/Ivanti Secure Access VPN client to the newest VPN client on macOS, it is likely there are orphaned VPN files that need to be removed. Unfortunately, just moving the Pulse Secure application to the Trash does not remove all relevant files. We recommend uninstalling the VPN client, then removing the following files via a terminal window (or via Finder with "hidden" files visible). Note that not all files may be present.
#unload the launch Daemons
sudo launchctl unload /Library/LaunchDaemons/net.pulsesecure.*
sudo launchctl unload /Library/LaunchDaemons/com.oracle.*
sudo launchctl unload /Library/LaunchDaemons/net.juniper.*

# Run the legacy uninstall script if it exists:
sudo /usr/local/juniper/nc/install/uninstall_nc.sh

#Delete the apps
sudo rm -rf "/Applications/Pulse Secure.app"
sudo rm -rf "/Applications/Ivanti Secure Access.app"
sudo rm -rf "/Applications/Network\ Connect.app"

#Delete the non-user-based components
sudo rm -f /Library/LaunchDaemons/net.pulsesecure.*
sudo rm -f /Library/LaunchAgents/net.pulsesecure.*
sudo rm -f /Library/Preferences/net.pulsesecure.*
sudo rm -f /Library/LaunchDaemons/com.oracle.*
sudo rm -f /Library/LaunchAgents/com.oracle.*
sudo rm -f /Library/Preferences/com.oracle.*
sudo rm -rf "/Library/Application Support/Pulse Secure"
sudo rm -rf "/Library/Application Support/Juniper\ Networks"
sudo rm -rf "/Library/Application Support/Oracle"
sudo rm -rf "/Library/Java"

#Delete the user-based components
sudo rm -rf ~/Library/Application\ Support/Pulse\ Secure
sudo rm -rf ~/Library/Logs/Pulse*
sudo rm -rf ~/Library/Logs/Juniper*
sudo rm -rf ~/Library/Preferences/net.pulsesecure.*
sudo rm -rf ~/Library/LaunchDaemons/net.pulsesecure.*
sudo rm -rf ~/Library/LaunchAgents/net.pulsesecure.*
sudo rm -rf ~/Library/Application\ Support/Java*
sudo rm -rf ~/Library/Application\ Support/JRE*
sudo rm -rf ~/Library/Application\ Support/Juniper*
Ivanti also offers a deep clean walkthrough here: https://help.ivanti.com/ps/help/en_US/ISAC/22.X/ag-22.X/uninstall_isac.htm. The instructions there are for reference only. The list above has been thoroughly tested and should be complete.
After the files above are removed, restart the computer and attempt a fresh install of the Ivanti Secure Access App from the UCSB Box location here (you will need to sign in using your UCSB NetID and password):
https://ucsb.app.box.com/folder/127781382319?s=tgtc8qb4460awsljgyrexx5zk160n7kr
If logging in with Ivanti Secure Access fails the first time, please give it another try. The second attempt should succeed. If you're having trouble at login, check the CEF FAQ below.
After the move to VPN SSO login on February 10, 2025, all CLI clients fail to authenticate due to the requirement of an embedded (CEF) browser. We currently have no estimation as to when Ivanti will support SSO (SAML) over CLI, but we continue to look for solutions.
When running /opt/pulsesecure/bin/pulseUI (Debian), if you get the following error:
DBUS api call failed with code: 2 - message:GDBus.Error:org.freedesktop.DBus.Error.ServiceUnknown: The name net.psecure.pulse was not provided by any .service files
This likely occurs when a background process (pulsesecure) is killed or otherwise fails. /opt/pulsesecure/bin/pulsesecure is a process that runs in the background when a user initiates /opt/pulsesecure/bin/pulseUI.
To resolve this issue, you can either reboot your machine, or simply restart the process:
sudo systemctl start pulsesecure.service
Once this process is started successfully, /opt/pulsesecure/bin/pulseUI should also successfully execute.
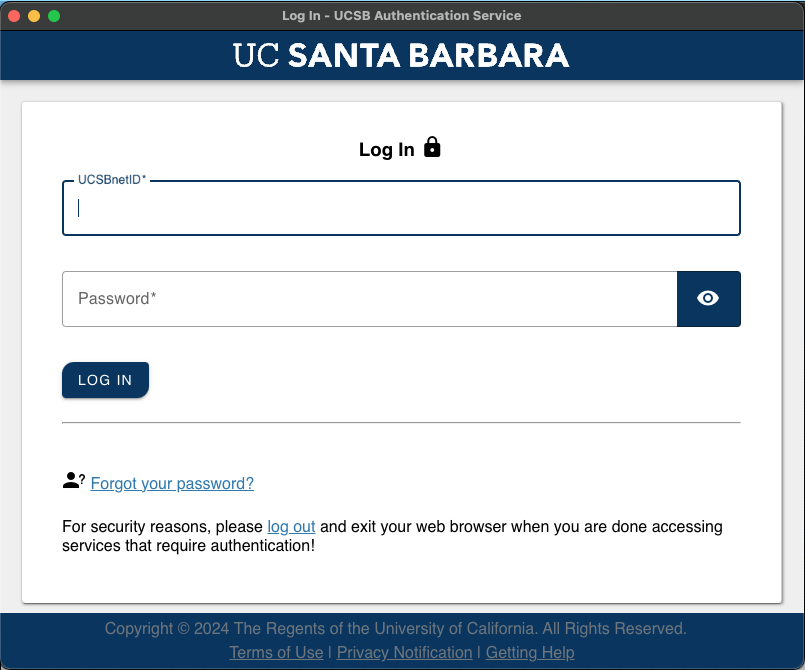
If you are installing the Ivanti Secure Access Client for the first time (or have not used it since campus switched over to SAML authentication on February 10, 2025), you will be prompted to install a Chromium Embedded Browser (CEF) which allows the Ivanti VPN client to bring up a browser window for your SSO login. This is true across all supported operating systems; the below example is taken from a Mac OS installation.
Once Ivanti is installed and you click Connect in the Ivanti VPN client, you will be asked to download and install a Chromium Embedded Browser (CEF). Click OK to continue.
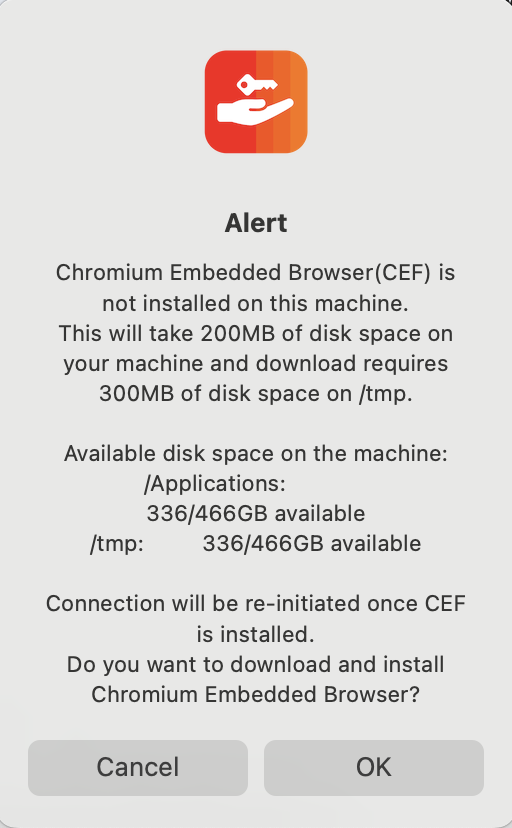
Once the CEF browser has been installed, a second icon will appear in the Dock and you will be presented with the screen below, asking for your UCSB SSO credentials:
Note 1: If you have trouble getting the SSO page above, try opening a terminal and entering the following command:
sudo touch ~/Library/Application\ Support/Pulse\ Secure/cefshm
Once your credentials have been authenticated, you will be prompted for your multi-factor authentication (MFA) method. Please note that if you close the browser, it takes a bit before it will reset and reopen. Until then, the Connect button will not be responsive. You can also try quitting the Ivanti application and reopening it.
You can install CEF via the terminal by entering the following command:
sudo /opt/pulsesecure/bin/setup_cef.sh install
For further information, please visit the Ivanti CEF knowledge base (KB) article found here: https://help.ivanti.com/ps/help/en_US/ISAC/22.X/ag-22.X/chromium_embedded_framework.htm
Note 2: Users have reported that when referencing the above link, setup_cef.sh is not found in /opt/pulsesecure. Rather, it is found in /System/Volumes/Data/Applications/Ivanti Secure Access.app/Contents/Plugs/JamUI/setup_cef.sh. If you find issues with the first path, we recommend trying the latter.
Note 3: If you are following the CLI CEF installation instructions in the above link and the command ./setup_cef.sh check_installed returns the following error:
Chromium Embedded Browser is installed
Validating the CEF lib...
Chromium Embedded Browser latest version is not installed
Please first complete quit the PulseUI (or reboot) and try uninstalling the CEF using the command ./setup_cef.sh uninstall. Then install the CEF again using the command sudo ./setup_cef.sh install.
There seems to be an issue where the user account is not getting appropriate permissions upon installation - instead, the system permissions are used to install. To resolve the issue, first try opening a terminal and entering the following command:
sudo touch ~/Library/Application\ Support/Pulse\ Secure/cefshm
Alternatively, you can add permissions for the current user to the relevant folder by doing the following:
-
Right click on the folder "~/Library/Application Support/Pulse Secure" and select "Get Info".
- Navigate to the Permissions section and "unlock" it to adjust the settings.
- Add the current logged in user attempting to access the Ivanti Secure Access client with Read & Write permissions
- Lock the permissions and attempt to relaunch Ivanti.
Lastly, you can delete the "~/Library/Application Support/Pulse Secure" directory and try installing CEF again (see the above FAQ).